
Apparently it is called patychky, and is traditionally served for major holidays. I know it will be part of my festivities from now on! This recipe is equal in total deliciousness to my aunt's, so I'm so thrilled I found it! Thanks mister anchovy! And thanks also to Anna H. who wrote me wanting to know if I was familiar with the recipe - it got me off my duff and out looking for it, after years of meaning to but never getting around to it!
Patychky
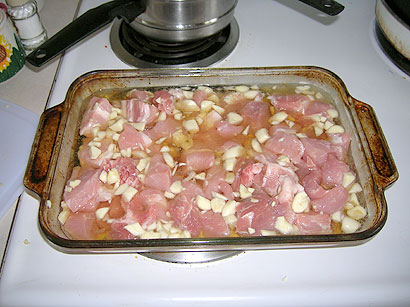
All the meat, cut up in small cubes, sitting in its marinade of 30 (THIRTY!) cloves of garlic, chopped, and a bottle of Dave's Premium Homebrew (not available in stores). ;) Looks good!
It recommends that you marinate overnight. I thought I'd go the extra mile and marinate it for two nights. DO NOT DO THIS UNLESS YOU HAVE A VERY TIGHTLY SEAL ABLE CONTAINER. I had it in what I thought was a well-sealed container, and still had to put it into 2 groceries bags, tied up, followed by a Glad garbage bag (the kind that's supposed to suppress odor). And STILL the whole fridge stank. Badly. Now, while I thought it smelled delightfully like kielbasa, my Irish-background boyfriend Dave did not appreciate its bouquet beyond the 24 hour mark. So keep this in mind - best stick to just 24 hours marination. :)
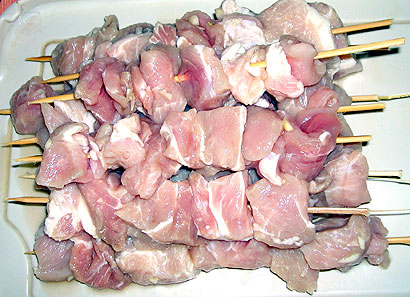
After a long marination, the meat is skewered. I had to break the ends off my sticks by a couple of inches (the blunt end, not the sharp end!) to make them fit my roaster pan (you'll want to measure before you put the meat on). And don't forget to soak your skewers in water the night before.
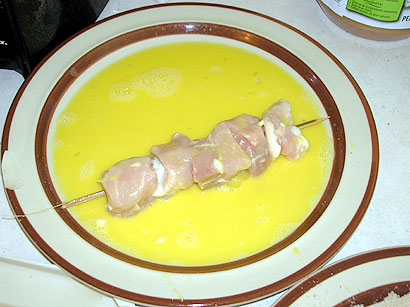
Dip the meat sticks in beaten egg.
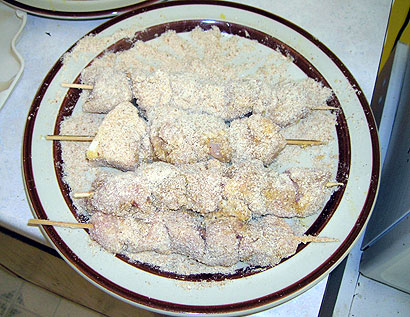
Then dip the meat sticks in seasoned bread crumbs.
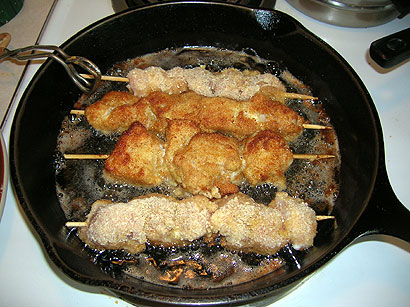
Time for the fryin'! In a generous amount of canola oil, over medium high heat. Startin' to get a nice deep brown color, which is what you want.

This is the way I laid out the celery bed. DO NOT do it this way! The point is for the celery to keep the meat sticks off the bottom of the pan. However, the way I've done it, some meat sticks sat inside the curves of the celery, and got soggy because the juicy run-off pooled in the celery. Make sure your celery is turned so the curve is facing the bottom (the concave side is down, with convex facing up). Hope that makes sense. Just don't do what I did in the photo and you'll be fine. Of course, you could use a whole lot less celery and just put 3 or 4 small pieces across perpendicularly, which would support the sticks and not create any juice pools. Your choice! :)
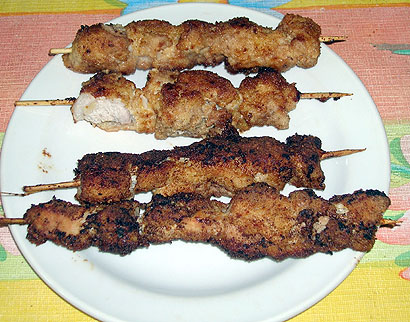
The finished product, out of the oven and ready to eat! SOOOO DELICIOUS!!!!
Seriously, if you are a fan of garlic AT ALL, MAKE this recipe. You will be so very glad you did! I can't even describe the flavour, aside from amazing!
Try it! Try it now!
:D
EDIT: As much as Dave didn't like the smell coming from the fridge on day 2, he really loved the finished product! :) Even now, he's looking over my shoulder, saying "Hey, that was really good, you should make that again!") :D

4 comments:
I'm really glad you liked the patychky. Growing up, they were my favourite holiday treat. One comment on the celery. I usually split the celery to make it less bulky and I lay the pieces the other way in the pan, so the each meat stick touches two pieces of celery. There are some shorter stouter sticks available. I was getting them at a place in Toronto, but the people there have closed shop (I think they sold the building and retired), so I have to find another source. With the shorter and stouter sticks, you don't have to either soak them or break them. Nice photos, by the way. I could almost taste the patychky.
Hello Ann
this comment for the Ukranian Easter bread, i am really interested to learn how to make this bread, and to make the decoration on top, i tried the decoration dough with flour and water, but its not holding as the one i see on the Ukranian Easter or Weddings , do you know the secret to the dough used for the top decoration??? thanks
Arlette
Hi Arlette,
The dough you use is the same dough that the bread is made out of, you just set some aside to make the decorations for the top. Its a slightly different recipe for each type of bread (Easter, Christmas, Weddings, etc), but I have the recipe for the Easter bread - paska - here, with a simple braid instruction for the top:
http://www.learnpysanky.com/recipes/paska.html
It takes a bit of practice to account for the rising during baking to make the decorations look just right upon completion, but you can do it! Hope this helps you!
I noticed your recipe doesn't call for flour as some other recipes. It works out ok?
Post a Comment